FORCES OF MUSIC
During this project we learned new instruments built new instruments and preformed in front of audiences. For me learning instruments wasn't hard at all since I already knew how to play I have been play for 1-2 years before the project started. Eric our music teacher that taught drums, guitar and piano. He helped me become a way better player I wouldn't have improved without him. He taught us a lot about music I learned about major scales, triads, minor scales and so much more. This video is an original song created by me with the help of a partner called the craziest day gabby is on bass, garret guitar, me drums and justin singing.
Made Instruments
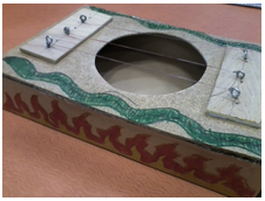
Created Instrument
When the guitar strings are played, they vibrate. The entire top vibrating is what causes sound waves, not the hole. These vibrations make the surface of the body of the guitar called the sound board also vibrate. The hole is just meant for air to come in and out of the body and can be put anywhere even on the back of the guitar. These vibrations are then amplified inside the body of the guitar. Then the full sound of the vibrations comes out through the sound hole (the
hole in the body of the guitar).
The pitch created by a guitar string is depended on three things. The string length, thickness, and tension. The lower the expected pitch, the larger the mass. You can also say that the larger the mass of the string, the slower the vibration and the lower the pitch. Once the guitar is tuned, the pitch is controlled by changing the length of the string is vibrating by pressing the string down at a particular fret.
To make my guitar better I could of have. Added more strings so there could be more
sounds. If I added a neck then it would of have gave me more opportunities to
make different sounds. The difference between my guitar and a actual guitar is
that theres no neck on my guitar, the bodies are different, no fret boards and
theres only three strings.
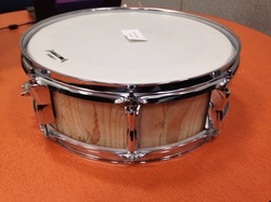
Professionally Built Instrument: Snare Drum
To start our construction we gathered eight feet of 2”x3” wood. We measured the wood and decided to make eighteen blocks of 2”x3”, having each piece 5 inches tall. We used the miter saw which allowed us to make accurate cuts. Once they were cut, we sanded them down. We cut each piece at a 10 degree angle to make the shell. Then we went back to the miter saw and cut each side at a 10 degree angle from where the marks were placed. After sanding we made a dry fit to make sure the eighteen blocks fit together nicely. A dry fit is when you put pieces together without gluing to make sure they go together. If they didn't then we would have to sand them until they did. We glued two blocks at a time to insure consistency. After they dried we got a set of two 6 and put it together with another. We repeated the process until everything was glued together. To make it as smooth as possible we sanded them down. We also added wood filling to each gap. Once we perfected our shell we added the accessories from an actual snare to make our project complete. Some of the pieces were the tension rods, snare guard, tension casings and so on. The hardest part of making our snare drum was at the beginning stages. We had a hard time figuring out how to construct our instrument.
When the snare drum is hit, it pushes down the drum head and receives potential energy. After that the drum head vibrates back and forth until the energy vanishes. The vibrations of the drum head produces pressure waves in the surrounding air. How hard the snare drum is hit effects the volume and sound.
Higher frequency depends on how tight the drum head is applied. So the looser the drum head the lower the frequency. The tighter the drum head the higher the frequency will be. To tighten a snare drum a drum key is needed. Turning each tuning rod to the right will make it tighter, turning to the left will make it looser. The way to tune your snare is by getting a snare drum tuner and tightening and loosening based on the information it provides you.
Origins of the Drum

In this portion of the project we got to learn the origins of our instruments and how it lead up to being how it is now. We got to learn about many early civilizations like the mesopotamians and we got to see how crazy their lives were. We split the research into two parts my partner did the instrument history portion and I did the geography portion. As you can see the first drum was first developed in Ancient Mesopotamia and went on from there.
